
This article is part of an SEO series from WooRank. Thank you for supporting the partners who make SitePoint possible.
If you own or optimize a site for long enough, you'll eventually find yourself staring down the barrel of a website migration. Website migrations can be a difficult technical process to go through, regardless of skill level, and one wrong step could mean severe consequences for your organic search traffic, with long-term effects on your SEO. In this article we'll go over some key techniques for you to implement before, during and after your new site goes live that will limit potential negative impact on your SEO efforts.
First, what is a migration? Simply put, it's moving your web files from one domain, server or platform to another. Website owners undertake site migrations for any number of reasons:
Bear in mind that moving your site to a new domain isn't going to get you out of a penalty. If you have messages in Google Search Console telling you about unnatural links, that penalty will be passed through redirects to your new site. In fact, attempting to migrate your content without resolving penalties will be seen as an attempt to cheat and could hurt you even more.
What to Consider Before Migrating1. Block bot access to your new site until you're ready to take your old one down. If they both are live in parallel you'll be hosting duplicate content, which will damage your new site's ability to rank in search results. There are two ways you can do this. The first is by using your robots.txt file. Prevent crawler access to the entire server using the following robots.txt:
User-agent:* Disallow: /The asterisks, or wildcard, sets the Disallow line for all robots. The slash in the Disallow line indicates that the entire domain is inaccessible. To make extra sure spiders don't crawl your page if they somehow find a link, add the "noindex" meta tag. This will block search engine bots from indexing anything after the
section. It looks like this: <meta name="robots" content="noindex">Note: Make sure you update your robots.txt and meta tag to allow search engine spiders access when you site goes live. It won't get indexed if you don't!
2. Create a spreadsheet with an inventory of all your current URLs. You can use a crawler like ScreamingFrog or DeepCrawl to find all your URLs. Or, you can export your URLs from your CMS or your Google Analytics account. Remember, that only pages that have received traffic will show up in Analytics. Once you've got a list of all your existing pages, map them to your corresponding new URLs. This will make it much easier to implement your redirects later.
3. Create benchmarks of your current traffic. There are a few tools for this step:
4. Create an XML sitemap for your new domain. Sitemaps contain a list of every URL in your site, as well as information about their importance, update frequency and when they were last changed. Submit your sitemap to Google Search Console and Bing Webmaster Tools to find any errors. This will help your new pages get indexed more quickly.
5. Create an inventory of your existing content, title tags and meta descriptions. This will help you maintain your current rankings in search results or even improve them, if you do some extra keyword research and tweak your content accordingly.
When You're Set to Go LiveOnce you've built your new site and set the foundation for your migration, it's time to use some tactics to make sure you aren't hosting duplicate content and that you are carrying over as much link juice as you can.
Alright, now that you've built yourself a sturdy SEO foundation, it's time for your new site to go live! Your work as an SEO, however, isn't done yet. You need to run tests and monitor key metrics to catch any errors before they cause serious damage to your new site's SEO.
If you added the "noindex" meta tag to your pages, make sure it's been removed, or the crawlers will index your URL, but not the content.
Redirects: Using ScreamingFrog, crawl your list of old URLs that you created at the beginning of the process to find any that don't successfully redirect. Make sure the pages only redirect once. Redirect chains make you look bad to search engines and they'll break Google's change of address submission.
Fetch as Google: Use the Fetch as Google tool in Search Console, under the Crawl area, to simulate a Googlebot crawl of your page. Submit your new URL to test that your homepage and category can be accessed by Googlebot. Use Fetch and Render to see your page as Google sees it. This is a great way to preemptively find any crawl errors you might encounter before they become a serious issue.
Check meta tags: If you use the rel="canonical" tag to avoid duplicate content, verify that the links point to your new canonical domains. If you have versions of your page in multiple languages, also check your hreflang tags (on your pages or in your sitemap, depending on how you decided to implement them) for any links using the old domain.
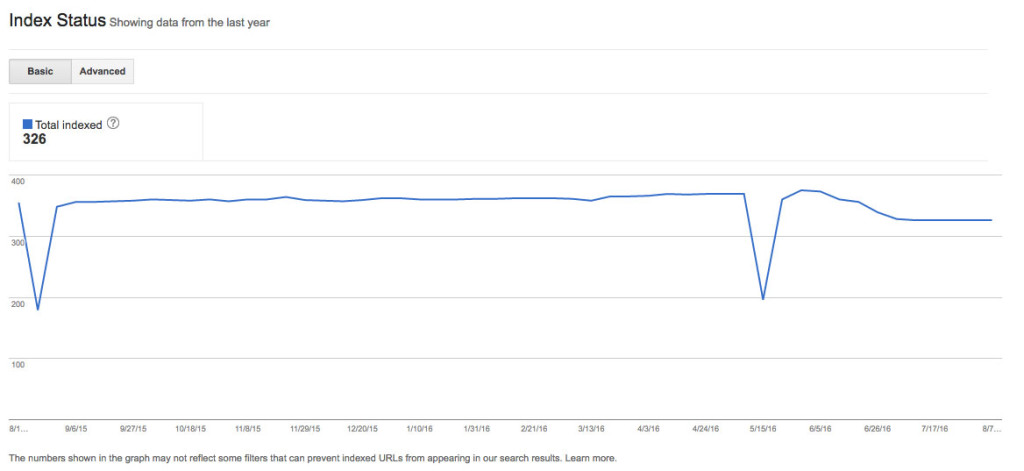
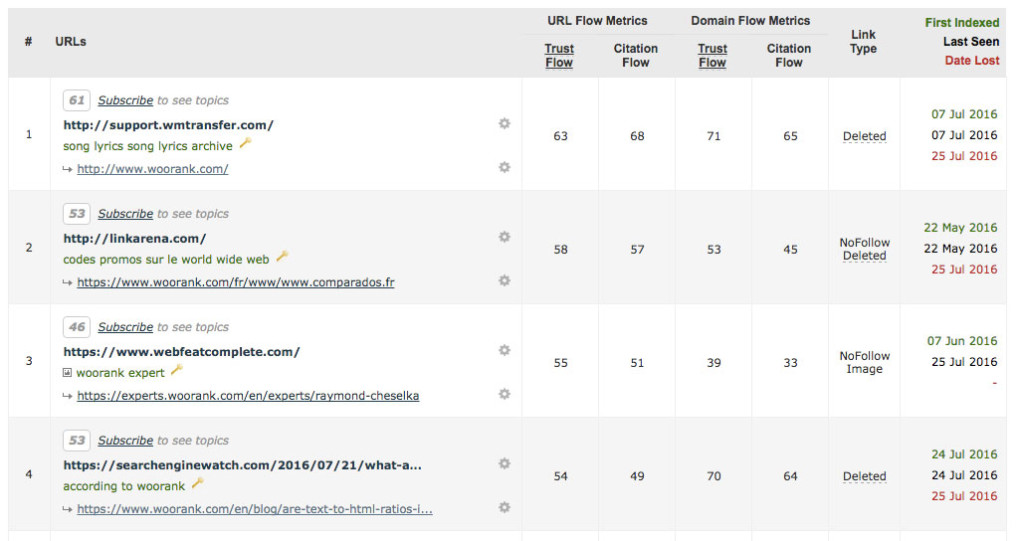
Like almost everything else in SEO, managing your site migration is an ongoing process. You need to be constantly checking tools like Google Search Console, SERP Checker and Google Analytics to make sure search engines are finding, crawling and indexing your new pages. Occasionally do a Google search for your target keywords to make sure your new URLs are replacing the old ones and that the sitelinks for your top pages (About Us, Categories, Contact Us, etc.) are appearing correctly. Use Search Console to demote irrelevant sitelinks.
Remember, it usually takes some time for the search engines to figure out how things have changed after your migration. It's normal to see a drop in traffic after making such a huge change, so don't jump to any conclusions right away. Monitor and measure your rankings and indexing for a few weeks, generally 3-4, for fluctuations to even out and sudden drops to recover a bit.
Have you gone through many site migrations? How did you prepare? What SEO issues did you encounter?
Source: Build a Solid SEO Foundation for Your Site Migration
No comments:
Post a Comment